Thursday, December 15, 2011

Learning MVC: SQL CE Membership Provider for ASP.NET

I tried uploading my MVC application on the web server for the first time. That proved to be slightly more complicated compared to using a server in the local network. I chose www.discountasp.net as a provider due to several positive reviews I've found. Registration, of course, was easy, and accessing the "control panel" too. The machine I develop on, however, is behind the proxy and the corporate firewall, so for deployment I had to choose publish to local PC and then copy the files over to my home pc and then to the provider's ftp. Doing the application part was really easy - just copied the files to the ftp, deleted the default "index.htm" page, stopped and started the web site from the control panel, and I could see the application main page straight away. The troubles, as I expected, started with database. I tried modifying connection strings to point correctly to the corresponding folders on the host, but sometimes I got back the 500 error, and sometimes something slightly more meaningful like that one:

I was slowly going through the host's manuals and the knowledge base, but what solved all my issues was the SQL Compact ASP.NET Membership, Role and Profile provider. Essentially, that's just four files that need to be added to the project's App_Code folder. Next, the web.config file has to be modified according to instructions on Codeplex or in the author's blog.

And then it just works - no need for SQL Express, no additional configuration - just copied the files over to the host. Extremely positive experience.

by . Also posted on my website

Friday, December 9, 2011

Learning MVC: User Data in a Partial View

After spending some time trying to apply a somewhat decent layout to the site, I decided to put some common information in the sidebar. This information would be the same on every page, but will be visible only to logged in users. Initially I rendered it as a section, but that's clearly inefficient as the section tag has to be added to each and every view. That's against the DRY principle of MVC - Do not Repeat Yourself. Much more obvious decision is to place the common part into the partial view, and render this view right in the master page layout. I had to overcome a few obstacles, however, before I achieved the desired result. Here's the outcome:

First step was to create a partial view, which I called "Stats.cshtml" and placed under "Shared" folder together with other common views. Here is the initial Stats.cshtml:

<div id="sidebar" role="complementary">
<div class="callout">
<h3>Stats:</h3>
</div>
<section class="tbl">
<table cellspacing="0">
<caption>Your Things To Do</caption>
<tr>
<th scope="col">
In Basket Items:
</th>
<th scope="col">

</th>
</tr>
</table>
</section>
</div>

Which can be rendered from the _layout.cshtml using several methods, such as Render or RenderPartial. More about which one to choose in references below. Let's say I use RenderPartial the following way:

<content>
<div id="main" role="main">
@RenderBody()
</div>

@if(Request.IsAuthenticated){
Html.RenderPartial("Stats");
}
</content>

This solves the bit where the sidebar is rendered properly, and only visible to the logged in users. Now to the second part - how to display user-specific information? Currently the layout knows nothing about it. One of the ways is to create a controller for the partial view. I created a controller "StatsController" and placed some pretty basic code in it:

public class StatsController : Controller
{
private modelGTDContainer db = new modelGTDContainer();
private InBasketRepository repository = new InBasketRepository();
//
// GET: /Stats/

[Authorize]
public PartialViewResult Stats(Users user)
{
var inbasket = repository.FindUserInBasketItems(user.UserID);
return PartialView(inbasket.ToList());
}
}

Note the use of PartialViewResult instead of the usual ViewResult. When I used a ViewResult I got a fairly nasty infinite loop. Now my RenderPartial is not so useful anymore, because it does not accept a controller as a parameter. So I have to change it to either Html.Action or Html.RenderAction. One of the overloads accepts a view name and a controller name, this is the one I need:

<content>
<div id="main" role="main">
@RenderBody()
</div>

@if(Request.IsAuthenticated){
Html.RenderAction("Stats", "Stats");
}
</content>

And that's about it. The last bit is to specify the model in the Stats.cshtml and to pass some output to the page - at least a simple label:

@model IEnumerable<GTD.Models.InBasket>

@if (Request.IsAuthenticated)
{
<div id="sidebar" role="complementary">
<div class="callout">
<h3>Stats:</h3>
</div>
<section class="tbl">
<table cellspacing="0">
<caption>Your Things To Do</caption>
<tr>
<th scope="col">
In Basket Items:
</th>
<th scope="col">
@Html.Label(Model.Count().ToString())

</th>
</tr>
</table>
</section>
</div>
}

And that's what the user will see:

References:

When to use Html.RenderPartial and Html.RenderAction in ASP.NET MVC Razor Views
ASP.NET MVC 3 _Layout.cshtml Controller
Passing data from View to Partial View
ASP.NET MVC3 Razor syntax help - I'm getting stuck in an infinite loop by . Also posted on my website

Tuesday, December 6, 2011

Learning MVC: Scalable Navigation

Today I tried applying a lesson from "Bulletproof Web Design" to scalable navigation. The goal, essentially is to avoid code wherever possible, avoid using images and allow the size of the tabs to be scalable.

The "bulletproof" approach, in short, is to use the nav element from HTML5 and wrap a list of tabs into it. Here's the whole of the HTML:

<nav role="navigation">
<ul id="menu">
<li id="nav-home">@Html.ActionLink("Home", "Index", "Home")</li>
<li id="nav-about">@Html.ActionLink("About", "About", "Home")</li>
</ul>
</nav>

And here's the css that I applied following the book (and had to adjust some things here and there):

nav[role="navigation"] 
{
display: block;
margin: 0;
padding: 10px 0 0 0px;
list-style: none;
background: #FFCB2D;
}

nav[role="navigation"] li
{
float: left;
margin: 0 1px 0 0;
padding: 0;
font-family: "Lucida Grande", sans-serif;
font-size: 80%;
}

nav[role="navigation"] ul
{
float:left;
width:100%;
margin: 0;
padding: 10px 0 0 0px;
list-style: none;
background: #FFCB2D url(images/nav_bg.gif) repeat-x bottom left;
}

nav[role="navigation"] ul li a {
float: right;
display: block;
margin: 0;
padding: 4px 8px;
color: #333;
text-decoration: none;
border: 1px solid #9B8748;
border-bottom: none;
background: #F9E9A9 url(img/off_bg.gif) repeat-x top left;
}

nav[role="navigation"] ul li a:hover
{
color: #333;
padding-bottom: 5px;
border-color: #727377;
background: #FFF url(images/on_bg.gif) repeat-x top left;
}

And if anyone's interested, the gif files I used are as follows:


And I got to the point where the tabs were functional and nicely displayed fairly quickly.

Now I got to the point where I had to make the tab "stick" in the selected state, so it would be visible which tab is currently selected. And the way it was done in the book was by adding an id element to the body and assigning a value to it. The css was then modified like this:

nav[role="navigation"] ul li a:hover, body#home #nav-home a, body#about #nav-about a, body#inbasket #nav-inbasket a
{
color: #333;
padding-bottom: 5px;
border-color: #727377;
background: #FFF url(images/on_bg.gif) repeat-x top left;
}

So in this case the hovering and selection is combined in one css declaration. However, the problem I had was that I could not just go to individual pages and set the correct id elements in page bodies. The way the Razor engine works, of course, is by rendering all the common HTML in the _Layout.cshtml, including the body tag. To achieve my goal, I had to modify the body tag after the page was rendered. That was not as hard a I expected - I wrote a small HTML helper which added a couple of javaScript lines to the page

public static IHtmlString BodyTagUpdate(this HtmlHelper helper, string text)
{
return new HtmlString(@"<script type=""text/javascript"">
document.body.id ='" + text + "';" +
"</script>");
}

and then I added a call to this helper on any page that I had to.
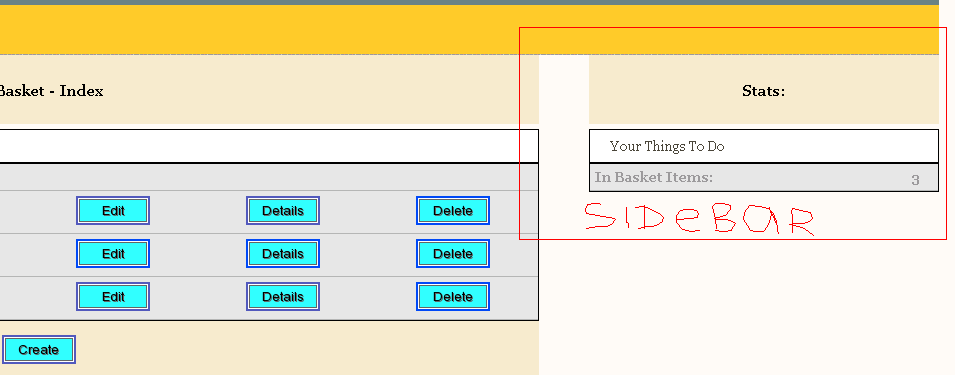
@Html.BodyTagUpdate("about")

And it worked. Now I was at this stage.

The last thing I added was displaying certain tabs only for the users that are logged on. This turned out to be extremely easy. This is the modified HTML of a navigation element:

<nav role="navigation">
<ul id="menu">
<li id="nav-home">@Html.ActionLink("Home", "Index", "Home")</li>
<li id="nav-about">@Html.ActionLink("About", "About", "Home")</li>
@if(Request.IsAuthenticated) {
<li id="nav-inbasket">@Html.ActionLink("In Basket", "../InBasket/Index")</li>
}
</ul>
</nav>

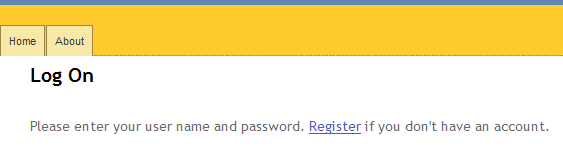
And the very last thing was to get rid of the built-in Log On/Log Off div and move it into the last tab. It involved writing a couple extra HTML helpers - one to render correct text, and the other is essentially an extension to the ActionLink which allows to pass HTML in and out so the link can be formatted. It is not critical but may become more useful later.

public static IHtmlString LogOnOff(this HtmlHelper helper, string text, bool isLogon)
{
if (isLogon)
{
text = "Log On";
}
else
{
text = @"<strong>" + text + @"</strong> - Log Off";
}

return new HtmlString(text);
}

public static IHtmlString ActionHTML(this HtmlHelper helper, string action, string controller, string text)
{
var url = new UrlHelper(helper.ViewContext.RequestContext);

var linkWriter = new HtmlTextWriter(new StringWriter());
linkWriter.AddAttribute(HtmlTextWriterAttribute.Href, url.Action(action, controller));
linkWriter.RenderBeginTag(HtmlTextWriterTag.A);
linkWriter.Write(text);
linkWriter.RenderEndTag(); //A

return new HtmlString(linkWriter.InnerWriter.ToString());
}

The partial view _LogOnPartial is now a bit simplified:

@if(Request.IsAuthenticated) {
string s = @User.Identity.Name;
IHtmlString t = Html.LogOnOff(s, false);
@Html.ActionHTML("LogOff", "Account", t.ToString())
}
else {
@Html.ActionHTML("LogOn", "Account", "Log On")
}

And the div that was rendering it into the _Layout.cshtml has now moved into the navigation area:

<nav role="navigation">
<ul id="menu">
<li id="nav-home">@Html.ActionLink("Home", "Index", "Home")</li>
<li id="nav-about">@Html.ActionLink("About", "About", "Home")</li>
@if(Request.IsAuthenticated) {
<li id="nav-inbasket">@Html.ActionLink("In Basket", "../InBasket/Index")</li>
}
<li id="nav-log">@Html.Partial("_LogOnPartial")</li>
</ul>
</nav>

Reference:

Bulletproof Web Design: Improving flexibility and protecting against worst-case scenarios with HTML5 and CSS3 (3rd Edition) by . Also posted on my website

Saturday, December 3, 2011

Learning MVC: Custom Html Helpers

Html helpers are used to render HTML and, in most cases, return a string which is then rendered as part of web page. The underlying idea is to reduce development work, decrease the amount of typing and generally provide a readable markup. However, I quickly found that the helpers provided with the MVC framework are small in number. Fortuantely, it is relatively easy to write your own html helpers. There are several ways to do it, but so far I liked extending the HtmlHelper class the best. There are a couple of "gotchas" there, but after that it looks elegant and efficient.

I started with creating a folder in my solution called "HtmlHelpers" and creating the Helpers.cs class there. The class is part of the namespace "HtmlHelpers". The first "gotcha", or two, is to add the namespace to the Web.config file. The second, smaller "gotcha" is that it may not be enough to add it to the main Web.config class. If, for example, the helper is used by the view which resides in the Views folder, then the Web.config in the Views folder (if it exists) also needs to have the namespace registered.

<pages>
<namespaces>
<add namespace="System.Web.Helpers"/>
<add namespace="System.Web.Mvc"/>
<add namespace="System.Web.Mvc.Ajax"/>
<add namespace="System.Web.Mvc.Html"/>
<add namespace="System.Web.Routing"/>
<add namespace="System.Web.WebPages"/>
<add namespace="HtmlHelpers"/>
</namespaces>
</pages>

Both the class and the extension methods have to be static. The type of the extension method can not be "string" - that's another "gotcha". The engine will escape all the HTML tags by default. This is why the HtmlString should be returned. That was my last "gotcha". Here's the whole class:


namespace HtmlHelpers
{
public static class Helpers
{
public static IHtmlString BulletedList(this HtmlHelper helper, string data)
{
string[] items = data.Split('|');

var writer = new HtmlTextWriter(new StringWriter());
writer.RenderBeginTag(HtmlTextWriterTag.Ul);

foreach (string s in items)
{
writer.RenderBeginTag(HtmlTextWriterTag.Li);
writer.Write(helper.Encode(s));
writer.RenderEndTag();
}

writer.RenderEndTag();
return new HtmlString(writer.InnerWriter.ToString());
}

public static IHtmlString Paragraph(this HtmlHelper helper, string text)
{
return new HtmlString("<p>" +text + "</p>");
}
}
}

The first method takes strings delimited by "|" character and creates a bulleted list from them. Here I used HtmlTextWriter. In the second method I've shown that the HtmlTextWriter is not absolutely necessary - it is possible to just add tags "by hand".

This kind of usage

@Html.Paragraph("A custom paragraph")
@Html.BulletedList("Item 1|Item 2|Item 3|Item 4")

Provides the following output

References:

Custom HtmlHelper Renders Text and not Markup
Understanding HTML Helpers by . Also posted on my website

Friday, December 2, 2011

Learning MVC: Adding Autocomplete Dropdown to the Input Element.

I added the autocomplete function to one of the views. Turned out to be a simple task if I use the jQuery-provided function. Initially I tried to use Dylan Verheul's plugin, but inevitably ended up with the "Object does not support this property or method" the reason for which I still did not find. Very frustrating. Anyway.

First I added the following line to the _Layout.shtml under Views/Shared

Next, I used the Named Sections to place the javascript that I want to be in my view. In the _Layout.shtml file I added the following line:

@RenderSection("JavaScript", required: false)

Now I can add the "JavaScript" section to any view in the following manner:

@section JavaScript
{
<script type="text/javascript">
$(function () {
$("#Title").autocomplete({
source: "/InBasket/Find",
minLength: 1,
select: function (event, ui) {
if (ui.item) {
$("#Title").val(ui.item.value);
}
}
});
});
</script>}

and the section will be added to the view when it's rendered. The script above binds the autocomplete function to the Title input field. The "/InBasket/Find" calls the Find method in the InBasketController (which I'll write a bit later). The minLength specifies how many characters have to be in the box before the autocomplete fires. If my database is large, I may set it to 3, 5 or more to avoid huge responses where everything starting with "a" is returned. But for now I just want to test the functionality, so I set it to "1". And then, when I select an item from the autocomplete list, it sets the value of my Title input box to this item.

So that's the View part, now the Controller part. I started in my repository and added a function to return all user's InBasket item titles that start with a particular string, and the results should not be case-sensitive.

//used by autocomplete: return all inbasket items where Title starts with a string provided
public IQueryable FindUserInBasketItemsByTitle(string title, int userID)
{
var inBaskets = db.InBaskets.Where(item => item.UserID == userID);
inBaskets = inBaskets.Where(item => item.Title.ToLower().StartsWith(title.ToLower()));
return inBaskets;
}

Next, I added the Find method to the View. The method gets the value from the Title input box and returns the JSON array of values. One thing to note: it is important that the string parameter is called "term". I didn't know that initially and was wondering for a while why my parameter "s" is always null. Here is the whole Find method:

public JsonResult Find(string term, Users user)
{
var inBaskets = repository.FindUserInBasketItemsByTitle(term, user.UserID);
var titles = new List();
foreach(InBasket inBasket in inBaskets)
{
titles.Add(inBasket.Title);
}
return Json(titles, JsonRequestBehavior.AllowGet);
}

And that's all - it only takes a dozen or two lines of code. The result is horribly ugly at the moment, but it's a proof of concept:

References:

Autocomplete dropdown with jQuery UI and MVC
ASP.NET MVC 3: Layouts and Sections with Razor
ASP.Net MVC 3 Razor: Include js file in Head tag by . Also posted on my website

Thursday, December 1, 2011

Learning MVC: Installing Application on IIS.

Today I tried installing the MVC application on IIS 7.

It was not an extremely complicated task, as long as understood the prerequisites. I installed the .NET Framework 4 on the server that has IIS7. I then registered the .NET Framework with IIS by running the registration tool (aspnet_regiis.exe)

Before publishing a project, it is a good idea to use the "Add Deployable Dependencies" to make sure all required libraries are added to the published application. Initially I missed this step and started getting errors like the one below.

Initially I tried to solve them by manually copying the required dlls to the bin folder of the application, but got tired quickly and found a better solution, as mentioned above.

It generated a rather long list of files, it probably would not be a good idea to copy them all manually one by one.

Next, I published the project to a file system.

Created a directory on the server that is running IIS under wwwroot/test, copied the published application to the server, created the virtual directory on the Default Web Site and pointed it to my wwwroot/test folder. That was enough to be able to start the application and see the welcome page. Unfortunately, that is not the end of it. At this point I can navigate to the "Register" page, but the App_Data folder does not yet exist and also when I try to go my InBasket page directly, I get a server error. Additionally, my local version of the application, which worked fine, now displays the same behaviour. Quite a few things to fix!

References

Bin deploy required dependencies for MVC 3 projects with Visual Studio 2010 SP1
ASP.NET MVC on IIS 6 Walkthrough
ASP.NET IIS Registration Tool (Aspnet_regiis.exe)
BIN Deploying ASP.NET MVC 3 with Razor to a Windows Server without MVC installed by . Also posted on my website